
What does cnc mean?
The word cnc stands for computer numerical control. By using a cnc machine we can easily design any object or a part of object according to our need. Now a days cnc is widely used in different industries to make the things easier and faster. A cnc machine is controlled by computer. By making some few clicks in our computer screen we can easily design the component we want. In a cnc machine stepper motors are used because stepper motors provide a better result and smooth design.
What is cnc plotter?
A cnc machine can be used to draw something by pen and paper. This types of cnc is called cnc plotter.
How does a cnc plotter work?
A cnc plotter is used to draw the images or letters you want. Basically it is a homemade writing machine. We have to choose one picture from our computer. The cnc plotter will draw the same picture that we have on our computer screen. Even you can write down the words, letters and large text by using a cnc plotter. For this cool features it is also known as a homemade writing machine.

Types of cnc plotter software –
Different software can be used to control a cnc plotter. The most popular software are Benbox, Inkspace and Grbl Controller. All these software are used to control the cnc plotter. But the most easiest software is Benbox. Benbox software is widely used for its simplicity of control. Benbox has a user friendly interface and anyone can use the Benbox software to control the cnc plotter.
How to make cnc plotter using arduino?
It is very easy to make your own cnc plotter. In a cnc plotter you have to use two stepper motors. One motor is for x axis and the other motor is for y axis. To make the circuit you can use a cnc shield and arduino. This things make the process so easier and you can easily build the cnc plotter at your home. Here I will talk about all the vital steps that you have to follow for making a cnc plotter. Now take a quick look at this steps one by one.
Components -
- DVD Drive
- Arduino uno
- CNC Shield
- A4988 Motor Driver
- Servo MG90S
Cnc plotter from dvd drives –
To make the structure I used two dvd drivers. At first I open this dvd driver and then I take out the stepper motor and the full sliding arrangement. After this connect the wires in both stepper motors. You can see it here –

Now I used some wooden boards and 3d printed parts to make the base of the cnc plotter. In the base area I connected one dvd driver with nuts and bolts. This dvd driver will be responsible for vertical movement at the time of drawing.

After designing the base, I connect some 3d printed parts vertically with the base of the cnc plotter. This parts will support another dvd driver at the top portion. This dvd driver is responsible for horizontal movement during the time of drawing.

In this setup the stepper motor of horizontal dvd driver will act as a x-axis stepper motor. Likewise the stepper motor of vertical dvd driver will act as a y-axis stepper motor. At the time of circuit connection, we have to connect this two stepper motors with the respective axis of cnc shield.
Now you have to setup the arrangement for pen stand. Here I used a servo motor and a pen. I connected the servo with the horizontal axis stepper motor. The servo will move with the horizontal axis during the time of drawing. Then I connected the pen with the servo. Also I used a spring to give the support for servo.

Cnc plotter circuit –
Now we have to make the circuit for the cnc plotter. To design the circuit we need several circuit component like arduino uno, cnc shield and A4988 stepper motor driver. At first you have to take the arduino uno and then you have to fix it in the back side of the cnc plotter. After this take the cnc shield and put it on the arduino uno. Now you have to take two A4988 motor driver. Put the A4988 motor driver on the cnc shield. Put one a4988 motor driver on x-axis and the other on y-axis of the cnc shield. Note that the potentiometer of the a4988 driver will be facing inside the cnc shield.
Connections of stepper motor –
The next thing is to connect the stepper motors with the cnc shield. You have to connect the x axis stepper motor with the x axis of the cnc shield and the y axis stepper motor with the y axis of the cnc shield.

After connecting the stepper motors you have to connect the servo motor in the cnc shield. Follow the steps to connect the servo in cnc shield –
(1) Positive pin of servo motor – +5 volt pin of cnc shield
(2) Negative pin of servo motor – Gnd pin of cnc shield
(3) Signal pin of servo motor – +Z pin of cnc shield
Now our circuit is ready to work. Give a 5 volt power supply to the cnc shield and arduino uno. If the voltage given to the cnc shield is more than 5 volt, then there is a chance of damage in stepper motors. So it is always preferred to use a 5 volt dc supply.
How to setup Benbox?
Now we have to setup the Benbox software. Download the Benbox software and install it in your computer. After this open the software and select the language you prefer. Then you have to choose the port and arduino type. Also you have to upload the firmware in the Benbox software. Now you have to change some settings in the Benbox software as per the requirement. Click on the three bars at the top right corner of the Benbox software and then follow the steps.
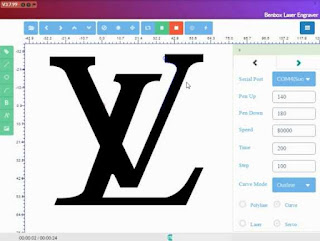
Benbox software settings –
(1) At first select the serial port of your arduino.
(2) Then set up the “pen up” and “pen down” values. This values will define the angle of the servo motor. By default the “pen up” value is assigned to the servo. When the cnc plotter start to draw something, “pen down” value is assigned to the servo. As a result the servo will create an angle for which the pen will be down to draw something.
(3) Also setup the “speed” and “time” as per the requirement.
(4) Select the “step” value according to the size of drawing surface. This value will define the steps of the stepper motor. By increasing or decreasing the value of “step”, you can increase or decrease the size of image.
(5) Select the curve mode as “outline”. Then select the “servo”.
After this you have to define the pin layout for x-axis and y-axis stepper motor and the servo motor in the Benbox software.
(1) Define the step pin of x-axis “2” and y-axis “3”.
(2) Define the dir pin of x-axis “5” and y-axis “6”.
(3) Select the servo pin “11” and “0”.
Now choose a picture from your computer and upload it in the Benbox software. Then click on the run button. The cnc plotter will start drawing the same picture that is uploaded in the Benbox software.


