
Components –
- Arduino Uno
- L293d Motor Driver
- Servo SG90
- Ultrasonic Sensor
- DC Geared Motor
- Wheels
- Jumper Wire
- Lipo Battery
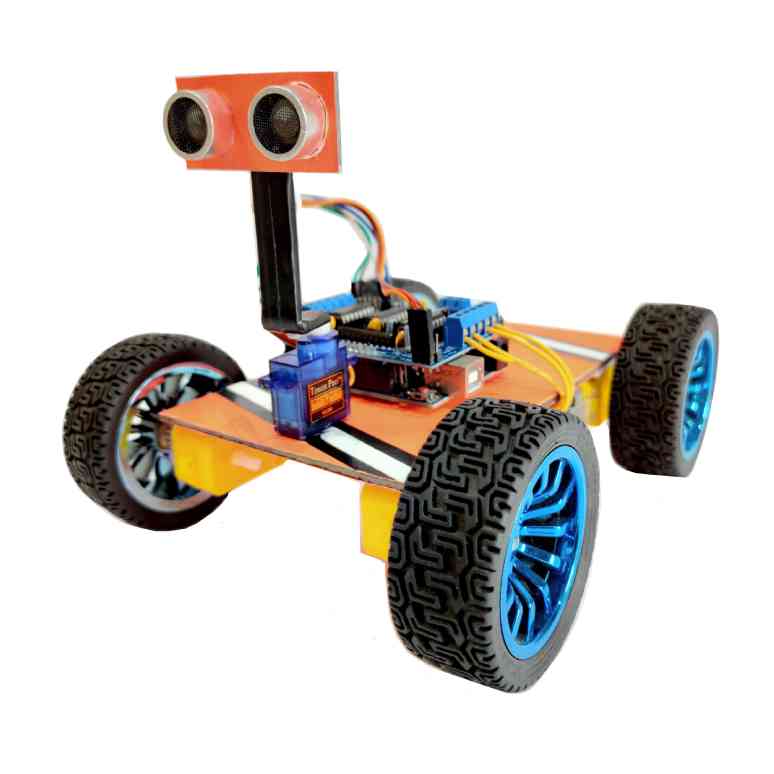
Frame –

Circuit Connection –
Circuit connection is the most important thing in automation projects. Because a simple fault in circuit may cause a big error in the performance of the robot. So it is advised to keep focused while making the circuit. In the circuit we use the arduino uno as the main processing unit of the robot. To avoid the problems of wiring we use L293d motor driver shield. This shield is fully designed to put up on arduino uno. It has also some other benefits. It can run four dc motors at a time. So connect the dc motors with the motor driver one by one. If you see the motors are running in the opposite direction at the run time, then you should interchange the connection of the motors. Also it has an inbuilt servo pins for connecting the servo. As a result we don’t need any other circuit to connect our servo. Now the next thing is to connect the servo in the L293d motor driver shield.

After connecting the servo, you need to take one plastic piece. You have to attach the plastic piece in the rotating arm of the servo. This plastic piece will provide the support to the ultrasonic sensor. Now take the ultrasonic sensor and fix it in the top of the servo. Connect the pins of the ultrasonic sensor with the pins of arduino.

Connect the vcc and ground pin with the +5 volt and ground pin of arduino respectively. Then connect the trigger pin with the A0 pin of arduino. Also connect the echo pin with the A1 pin of arduino. Now the circuit connection is finished. For better understanding of the circuit we provide the diagram of the circuit below –

Arduino Code –
//OBSTACLE AVOIDING CAR//
#include <AFMotor.h>
#include <NewPing.h>
#include <Servo.h>
#define TRIG_PIN A5
#define ECHO_PIN A4
#define MAX_DISTANCE 200
#define MAX_SPEED 150 // sets speed of DC motors
#define MAX_SPEED_OFFSET 20
NewPing sonar(TRIG_PIN, ECHO_PIN, MAX_DISTANCE);
AF_DCMotor motor1(1, MOTOR12_1KHZ);
AF_DCMotor motor2(2, MOTOR12_1KHZ);
AF_DCMotor motor3(3, MOTOR34_1KHZ);
AF_DCMotor motor4(4, MOTOR34_1KHZ);
Servo myservo;
boolean goesForward=false;
int distance = 100;
int speedSet = 0;
void setup() {
myservo.attach(10);
myservo.write(90);
delay(2000);
distance = readPing();
delay(100);
distance = readPing();
delay(100);
distance = readPing();
delay(100);
distance = readPing();
delay(100);
}
void loop() {
int distanceR = 0;
int distanceL = 0;
delay(40);
if(distance<=100)
{
moveStop();
delay(100);
moveBackward();
delay(300);
moveStop();
delay(200);
distanceR = lookRight();
delay(200);
distanceL = lookLeft();
delay(200);
if(distanceR>=distanceL)
{
turnRight();
moveStop();
}else
{
turnLeft();
moveStop();
}
}else
{
moveForward();
}
distance = readPing();
}
int lookRight()
{
myservo.write(50);
delay(500);
int distance = readPing();
delay(100);
myservo.write(115);
return distance;
}
int lookLeft()
{
myservo.write(170);
delay(500);
int distance = readPing();
delay(100);
myservo.write(115);
return distance;
delay(100);
}
int readPing() {
delay(70);
int cm = sonar.ping_cm();
if(cm==0)
{
cm = 250;
}
return cm;
}
void moveStop() {
motor1.run(RELEASE);
motor2.run(RELEASE);
motor3.run(RELEASE);
motor4.run(RELEASE);
}
void moveForward() {
if(!goesForward)
{
goesForward=true;
motor1.run(FORWARD);
motor2.run(FORWARD);
motor3.run(FORWARD);
motor4.run(FORWARD);
for (speedSet = 0; speedSet < MAX_SPEED; speedSet +=2) // slowly bring the speed up to avoid loading down the batteries too quickly
{
motor1.setSpeed(speedSet);
motor2.setSpeed(speedSet);
motor3.setSpeed(speedSet);
motor4.setSpeed(speedSet);
delay(5);
}
}
}
void moveBackward() {
goesForward=false;
motor1.run(BACKWARD);
motor2.run(BACKWARD);
motor3.run(BACKWARD);
motor4.run(BACKWARD);
for (speedSet = 0; speedSet < MAX_SPEED; speedSet +=2) // slowly bring the speed up to avoid loading down the batteries too quickly
{
motor1.setSpeed(speedSet);
motor2.setSpeed(speedSet);
motor3.setSpeed(speedSet);
motor4.setSpeed(speedSet);
delay(5);
}
}
void turnRight() {
motor1.run(FORWARD);
motor2.run(FORWARD);
motor3.run(BACKWARD);
motor4.run(BACKWARD);
delay(500);
motor1.run(FORWARD);
motor2.run(FORWARD);
motor3.run(FORWARD);
motor4.run(FORWARD);
}
void turnLeft() {
motor1.run(BACKWARD);
motor2.run(BACKWARD);
motor3.run(FORWARD);
motor4.run(FORWARD);
delay(500);
motor1.run(FORWARD);
motor2.run(FORWARD);
motor3.run(FORWARD);
motor4.run(FORWARD);
}

Now we come to the end of this project. The last and final thing that you have to do is battery connection. For this we used a 7.4 volt Lipo battery. But you can also use a 12 volt Lipo battery. It totally depends upon you and it does not affect the performance of the robot. After connecting the battery switch on the circuit. Now your robot might be start working. You can place your robot on a smooth surface and observe the performance of robot. You can put some additional obstacles to check the efficiency of the robot. However if it is not working properly, you should recheck your circuit and the code. This may solve your problems. And this is all about the obstacle avoiding robot.


